DMK IC Capture Video Settings Follies

I have been using a new planetary imaging camera for the last several months. I have a DMK DFK21AU04 640×480 USB 2.0 camera. I originally bought a firewire camera but was able to swap it for a USB version, much more convenient since my laptop does not have power to the firewire port. I also purchased a color camera because I am not yet up to getting a full filter wheel set-up to do RGB planetary imaging. Yes, you could call that lazy.

One struggle I have had is choosing from the multiple choices of video format and codec. The Imaging Source’s software gives you many choices. I learned the hard way that some of the codecs cannot be read directly from Registax. That requires reading the files in VirtualDub and saving them as BMPs via the export function. This is an extra step I’d like to avoid.

Now there is an advantage to going to BMPs. Registax appears to have a limit that prevents it from reading more than a 2,000-frame AVI. There is no limit to the BMP processing, you just drag the list of however many thousand images you have right into the Registax window and it works fine. This has allowed me to do some nice Saturn imaging that would not have been as good if I had to use fewer images and allowed me to process some captures where I had shot over 2,000 frames before I was aware of this consistent limit.

IC Capture lets you set the video size and color format with three settings and supports a whole bunch of codecs for compression. Being lazy, I went with the default which is video size and color of YUY2 and a compression codec of DV Video Encoder. Of course this could not be read by Registax, but I used my workaround through VirtualDub and all was well, or so I thought.

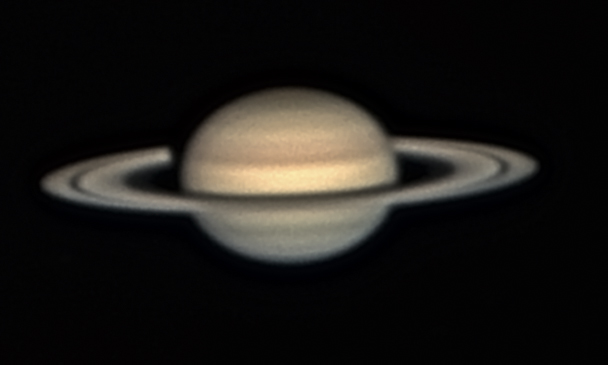
Last Friday I took and processed this image of Saturn.

Saturn with DV Encoding

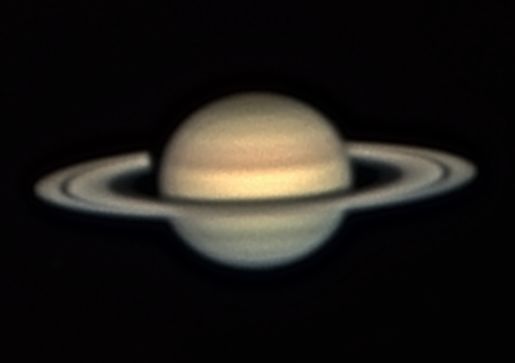
Not the greatest Saturn image, but OK. There’s another story on the processing of the image, but we’ll get to that in another post. One problem though. I posted the image in the Bad Astronomy / Universe Today forum and Mike Salway noted that it looked a bit squished. He was right. Here is a corrected version of the image.

Saturn with correct aspect ratio

Apparently the DV encoder makes the image widescreen, stretching the 640 dimension to 480. I finally did some research and found that the recommendation was never to use compression. So that sent me into experimentation mode.

The recommended format for imaging is Y800. Y800 appears black and white but debayering will reveal the colors. In Registax on the first screen, select additional options, use debayer and GB under the Debayer options. Full instructions are available from the Imaging Source blog. Rather than try to communicate this in text, here is a table with my results (FPS=Frames per second).

IC Capture Table

* Can’t use BMP output directly in Registax. See this post in CloudyNights Forums.

So the bottom line is this. If you need fewer than 2,000 frames with 60 fps, go with Y800/Unspecified and go straight to Registax. If you’re OK with 30 fps, but need lots of frames, go with YUYV/Unspecified and run it through VirtualDub to get BMPs. If you need 60 fps and lots of frames, use BY8 and RGB24. It uses a lot of disk space, but you get your frames and your frame rate.

Comments and corrections greatly desired.

Getting Deep on Processing Math

Since we’ve been going back and forth to the LRE house and I haven’t had a chance to get things fully set-up in LA for CCD imaging, my main target has been the Moon. As in the previous post, I have tried additional mosaics. I have also kept experimenting with processing Lunar images.

My basic process in PixInsight is:

  1. Convert the image to 32 bit
  2. Upsample by 200%. Deconvolution simply won’t work on the original pixel depth.
  3. Use regularized Van Cittert algorithm deconvolution to sharpen the image
  4. Flatten the image with HDR Wavelet transform at the default settings
  5. Adjust the contrast of the image with curves
  6. In some cases, do some minor noise reduction with GreyCStoration.

Most of my time is taken tweaking the deconvolution parameters. (If you are starting on this, the PixInsight team has a great processing example on their site.) This time, I learned that other parameters matter too.

In iterating on the deconvolution, I noticed that this image had more noise that other recent ones. The deconvolution was bringing it out clearly. After several hours, I figured out what I had done differently. On my prior Lunar images, I had selected bicubic b-spline interpolation rather than default when I upsampled the image. No particular reason, but I picked that instead of the default. This time, I had used the default (“automatic”) which I believe chose bilinear interpolation.

No, I don’t understand the difference in the algorithms, but I know they are different. Time do do some reading on the subject.

So I experimented and learned that for my Lunar images, bicubic b-spline is sharp, cubic b-spline produces less noise, and the other offered choices aren’t worth using. And I learned that you can go past critical details in processing your image without even knowing it. Layers. (Onion layers, not parfait layers, if you follow the reference.)

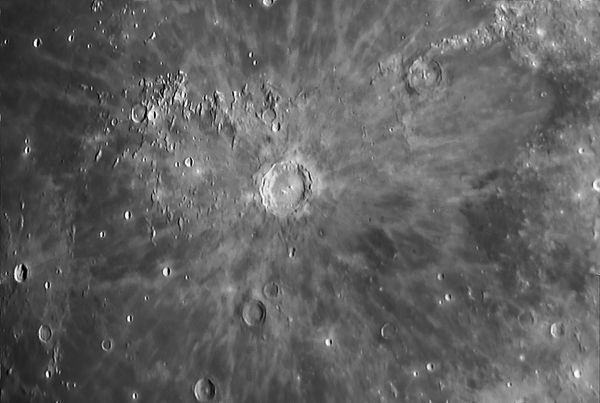
Copernicus Crater, February 17, 2008

Last Sunday night was a mostly clear night out in the Cahuilla valley. That provided the opportunity for some astronomy and astrophotography. The night before might have been a bit better, but it was cold with the temperature already below freezing at 9pm. Yes, that’s really that cold, but it’s awfully cold to be outside with a telescope.

Earlier in the day, I had installed the new drive motor and tested the new controller for the CG-5 mount. Everything seemed to be working fine. The first order of business was to collimate the scope. The last time I had critically looked at the collimation of the C-8 the out-of-focus view of a star was quite asymmetric. It took a good 45 minutes to get it done, but I am now confident that the C-8 is in good collimation.

The Moon was getting close to full, only two days away, so I was planning on Lunar imaging. Dew became the first problem. I believe that my prior CG-5 motor controller box was destroyed because I used a hair dryer to dry the corrector plate while the drive controller was plugged into a Radio Shack 6v transformer (not a regulated unit but a little brick). Given this, using batteries for the CG-5 drive was required.

The next problem was that my new ImagingSource firewire camera did not respond. The computer did not see it. I tested the firewire port and it was fine. Gloom. The I remembered that I did bring my trusty Phillips ToUCam Pro. I got that set up and focused on the Moon.

I have always wanted to try creating a mosaic. I shot four shots around Copernicus crater to create my first mosaic. I processed each AVI as consistently as possible, in the end, doing no wavelet or exposure correction in Registax. I combined the four images in Photoshop, using the built-in panorama capability. Registax had been shifting the histograms of the stacked images which made the composite uneven; I turned off that option in Registax.

After combining the images in Photoshop. I did all the processing in PixInsight (now a commercially available product!). I had to crop the image before deconvoluting the image as the white space caused errors in processing. here is the processing story.

  1. I changed the image format to 32 bit depth, and then doubled the pixel depth by increasing the resolution. Even though this added no data (and probably introduced noise), I could not get decent deconvolution results at the lower resolution.
  2. The combined image had some strange color tints to it, probably the result of creating the mosaic. I extracted the luminance and worked with that.
  3. I then used the Regularized Van Cittert deconvolution algorithm in PixInsight to sharpen the image. The tutorial they have is excellent. I used a standard deviation of 2.75 and a shape of 1.5, with standard noise reduction and a 0.15 increase on the highlight in dynamic range extension. That final bit was important so I did not clip the bright areas during deconvolution. This step was the key step in creating the image.
  4. The next step is where I created two versions with different contrast profiles. On the first, I applied a default HDRWavelet transform to the image to bring up the dark areas without clipping the whites. In the end, this led to a more even image overall, but one with more contrast in the details. On the second, I skipped the HDRWavelet transform.
  5. On both versions, I applied a moderate noise reduction with GREYCstoration and a final tweak to the contrast with curves.
  6. Final steps were to shift to 16 bit integer, then move to Photoshop to save as web size.

This is version 1, with a sharper contrast in the details, but flatter overall.

Copernicus with HDRWavelet Transform

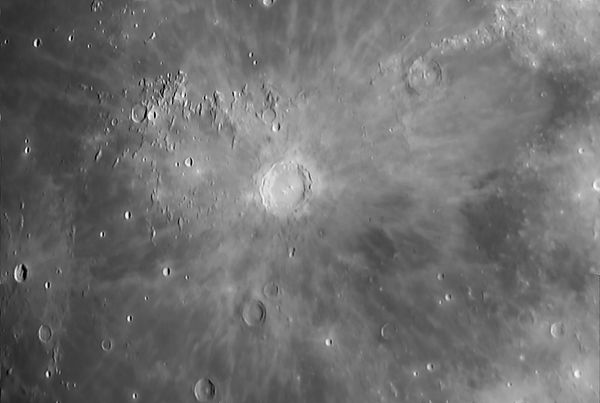
The second version is here. It is a bit softer in contrast.

Copernicus with softer overall contrast

I’d be curious to see which version people like better.

AIC Day 3 — Live Blog

It’s 8:30 AM here in San Jose and the session is getting started. Last night was very good. We saw New Mexico Sky’s set-up in Western Australia, and actually did see an image taken by the 24″ RCOS in New Mexico. Good conversations, much information shared, a good time had by all.

8:30 AM — Ken Crawford Depth of Field Processing. Recommends a Wacom tablet. Tools in Photoshop: Smart Sharpen, high pass, and shadow / highlight. Overdo the processing a bit, then back off when you blend the processed layer. Soft light / screen process looks interesting. Jay GaBany showed its use last year, but this presentation makes it more understandable. He is really demonstrating magic with Photoshop.

…Break…

Bought a CFW-10, an OIII filter, and an SII filter over the break. Look for a CFW-8 on Astromart soon.

10:30 AM — Jay GaBany Color Filtering. Does not bin his color exposures, and uses the color exposures combined to make a synthetic luminance. Many techniques, very interesting image enhancement. Details in the image really come out. Jay concluded with an amazing shot of NGC 891.

11:00 AM — Door prize time! Very nice prizes, many worth hundreds of dollars. Art won a filter!

And we are done. Great conference!

AIC Day 2 — Live Blog

8:30 AM — We’ve been called away from the exhibit area and the introductory video is playing. Day 2 of AIC 2007 is under way. I can’t vouch for the success of yesterday’s live blog, but since I have a seat with power and internet, I’m going to give it a try again today. There are about 10 people who are attending the conference from outside North America.

8:40 AM — What I thought they looked like. A recurring and amusing feature from Steve Mandel.

8:50 AM — Rob Gendler, recipient of the 2007 AIC Hubble Award. Gendler has had 53 APOD postings, including one today. The Mega-image, multi frame mosaic of great scale and high resolution. This was a really outstanding talk, with great advice on how to plan and execute a major imaging project, along with great images to inspire one to try.

9:30 AM — Don Goldman on narrow band filters. Very good, detailed presentation.

…Break…

10:50 AM — Neil Fleming on narrow band imaging. Neil images from Boston, with very bad light pollution, just like at Observatorio de la Ballona. Interesting comment: do only one registration of image data. So, don’t align each channel’s subs, then the channels to each other. Instead, complete one channel, and use the final result from that channel to align the other channel subs. Really great Photoshop discussion. Recommends using “local contrast enhancement” from Noel Carboni’s Astronomy actions.

11:20 AM — Steve Cannistra — Bi-color imaging. Did you know that a dog is a dichromat (able to only see two colors)? Very good tutorial on doing color combination with layers, non-destructively.

…Lunch…

1:00 PM — Took the plunge and bought a new planetary imaging camera, a DMK firewire camera. I opted for the color imager and the smaller chip. OPT was offering 10% off, and since I was going to buy it at some point anyway, that discount was enough to make the purchase worth it.

Now, founding sponsors speak at AIC.

  • RC Optical with high performance optics and machines. Automated satellite tracking. Carbon-fiber based mirrors.
  • SBIG Astronomical Instruments — new STX series of cameras, stand-alone autoguider, new AO with substantial travel and less back focus than the AO-7. STX: better cooling, many new chips, simultaneous guiding (fast corrections with remote head, slow corrections through main scope, addresses differential deflection), differential guiding (artificial guide star vs. real star), bigger guide chip, USB & ethernet, software controlled fan, available Q2 2008.
  • Software Bisque — Focused on rewriting all applications for multi-platform use.

1:30 PM — Mike Bolte on Imaging with the Big Guys. Lick Observatory history, adaptive optics, and the Keck telescopes. Amazing images with adaptive optics on the Keck. Plans for a 30 meter telescope to be built by 2016. To be located in Chile, Mauna Kea, or Baja California.

…Break…

2:50 PM — Daniel Vershatse — Imaging and observing in the Southern Hemisphere.

3:30 PM — Chris Schur Enhanced Hydroigen Galaxy Imaging. The key concept is to subtract the red from the Ha to reveal just the Ha portion. Add back to R/G/B at 100%/10%/5% to get correct color. Really a great technique.

4:00 PM — Building a remote observatory. Key things: Altitude, elevated platform, round, separated, massive pier, thermal control, and lightening protection. Central pier weighs 70,000 pounds. Pier is manhole pipes, 4′ outside, much less expensive, about $2,500 in material costs for a 20′ pier. Metal construction for the enclosure because of low humidity. Ash domes used for the top.

Done for the day.

AIC Day 1 — Live Blog

10:00 AM — The program begins. Many more sponsors this year. And the crowd is quite large. We are on the first day, which is an extra feed, but the room is mostly full. 254 people expected for Saturday. Adam Block will announce a new public observatory tonight — perhaps the Caelum project has been successful!

10:10 AM — Introducing Adam Block, late of the Advanced Observing Program at Kitt Peak, imager extraordinaire and now operator of Caelum Observatory. Kicking off “Must Know Processing” presentation. By show of hands at least half (if not more) of the audience are first-time AIC Attendees. Topic 1: Calibration in Maxim DL and CCDStack.

We’ll see if it makes sense to keep up the live blog or not…

10:20 AM — Demonstrating the automated calibration features in Maxim DL — which is what I really like about the program. On to CCDStack. Fixed the microphone :-). He is starting, in both cases, from master flats/darks/biases. Skipping the hard lifting of combining the subframes to create the master. Cool image of asteroids in the — even some new ones.

10:30 AM — CCDStack reports the actual bit mapped value depending on the screen stretch. Lower right hand corner. I wish they would really show de-blooming in CCDStack, because I have never had it work accurately on the large blooms I get on my ST-10.

10:40 AM — Cool feature in Maxim DL, the Command Sequencer. Define a set of actions and go. Now on to Data Reject in CCDStack. It sure looks like it rejected many more pixels than Maxim DL. Over rejected if you ask me. Showing the percentage, it is over 1%, probably really too high, by the standard described by Adam.

11:00 AM — Alignment in CCDStack. Not sure why he isn’t using star snap to begin with. It works quite well. The sample does not have dithering, and I always dither. Now he is on to start snap.

11:15 AM — Getting into the statistics of pixel values. Good background knowledge to have when applying techniques. Median, mode, mean, etc. And on to Data Rejection. Normalization means we will compare pixels on a comparable basis — subtracting sky brightness, then scale to the same brightness. CCDStack uses mode to determine sky brightness as it is insensitive to inclusion of stars. Weight in CCDStack is the inverse of the scaling factor.

11:30 AM — Excel data analysis — need to look into that. Reminder to Adam Block: Don’t do Excel live…

11:40 AM — Choose data rejection based on standard deviations. So the factor in CCDStack is the sigma value. Adam recommends 2.0 as a good number to work with. Speaks about sigma reject as contrast enhancement, rather than noise reduction. I wonder why he isn’t using the top image % option, which would select a sigma factor to reject a fixed percentage of the image. Good question on how CCDStack would handle summing with rejected pixels. Adam recommends using the mean rather than the sum. In fact, the question on rejected pixels also applies to mean combine — does CCDStack count the rejected pixels when calculating the mean? Adam targets 2% to 3% rejection.

…Lunch…

1:00 PM — MaximDL normalization is done within the sigma clip function — use linear normalization. Didn’t really get the threshold rejection.

1:20 PM — Photoshop essentials. Move a layer with darken blending mode to fix star elongation. Color mask to select stars, minimum filter to de-emphasize stars.

1:55 PM — DDP, while fiddling with PixInsight at my seat.

…Cookie break…

2:45 PM — Very cool use of multiply blend mode to brighten dim areas. And Adam does not use layers to avoid destructive edits. Copy base layer, brighten base layer a lot, change top layer to blend mode multiply, reduce opacity to bring underlying brightness out. On to High-pass filter process. Select stars by color range highlight, expand by 9, feather by 5, cut from high-pass layer.

3:00 PM — LAB color. Convert to LAB color space, stretch (Adam increased contrast) a channel to enhance red, b channel to enhance blue.

3:20 pm — To bring out fractional values in floating point images, use pixel math to bump up total values before saving as 16 bit integer.

End of presentations for the day.

AIC Day 0

Terrible start to the trip. First off-LAX parking lot was full, but not posted full, so I had to drive in and out. This may have cost me the opportunity to stand by on the 3pm flight. I was booked on the 4:05pm flight that eventually left at 6:05pm. Then my bag slipped and hit me in the face, splitting my lip as I left the airplane. The SAP event and Peter Ueberroth’s speech was good, and I got dinner and some good wine thanks to SAP. Finally, of to San Jose and AIC.

I went to the bar after checking in and had drinks with Doug George of Cyanogen (Maxim DL) and Steve Bisque of Software Bisque (Paramount ME). I actually went into the bar and got into the conversation, so interpret “had drinks” in that context. Steve’s brother was there too as were several other people.

So here is what I learned:

  • Meade is toast. Going private, moving out of Orange County, probably entirely to China
  • The RCX mount is the going to go off the market and is “the most costly mistake they ever made”
  • No one with a going business would write for Linux because all Linux users expect software for free, and that’s not the way to run a business
  • Maxim DL 5.0 is coming
  • Meade has been a bully with lawsuits against many business partners (or even almost partners)

That’s all for a late Thursday night.

Perseid Meteor Shower

It has been almost a month and I am finally getting around to writing up the Perseid experience, even as a quickly wrote up Pre-Perseid the day after. This post documents my August 12, 2007 Perseid experience.

My wife and daughters headed home to LA mid-afternoon, as a friend of the family was arriving the next day, too early for a return trip after staying up most of the night as I was planning. I set up out on the patio by the master bedroom. I had a lawn chair, my 12×90 binoculars, a table, and my C-8 (still without drive motors, back to the dark ages!). I also set up my FM2 on a tripod. I had some ISO 160 and ISO 400 professional color print film.

Many people make meteor observing a science, and set themselves up to get many photos, and record accurate meteor counts, etc. That was not my intent. I wanted to see as many meteors as I could, do some visual observing so I wouldn’t go nuts by myself out there, and see if I could get some interesting pictures. I think I succeeded on all accounts. But I did not get a super picture or any real scientific data.

I had everything set-up at about 8:50 pm (all times PDT). I spent the first hour focused on observing, going after globular clusters and double stars. I was using my trusty Celestron guide to the sky. I saw M80, M10, M12, and NGC 6293. I picked out at least 6 double star pairs. This was mixed with meteor watching. There were several bright grazers with long tails during the first hour of observing.

Moving into the 11:00 to midnight hour, the pace of meteors picked up. During that hour, I was fairly dedicated to meteor watching and recording, and saw a Perseid about once every other minute. They would come in bunches and a few non-Perseids were mixed in with the Perseids. I distinguished the non-Perseids based on their direction. The meteor shower is named after constellation that is the are of the apparent source of the meteors. The Perseids come from Perseus, in the northern sky this time of year, just below Cassiopeia. Any meteor that did not move generally from north to south I considered not a Perseid.

There were many bright trails during this hour. Things slowed down around midnight. I took a look at M31, the Andromeda galaxy, and then looked at the Double Cluster in Perseus. It was fantastic, a double clump of stars. Very impressive. The midnight to 1:00am hour was much slower. Only about 20 in the hour — one every several minutes, with this count probably being low because I stepped away several times. At 1:00am I put away the telescope.

After 1:00am the meteors seemed to come in clumps. I’d go several minutes and see none, then get a bunch. I recorded about 45 meteors between 1:00am and 2:30. I went in at 2:30. I know that the more serious observers out there will properly tell me that it was just getting started, but I was too tired to keep looking. I had accomplished my observing goals.

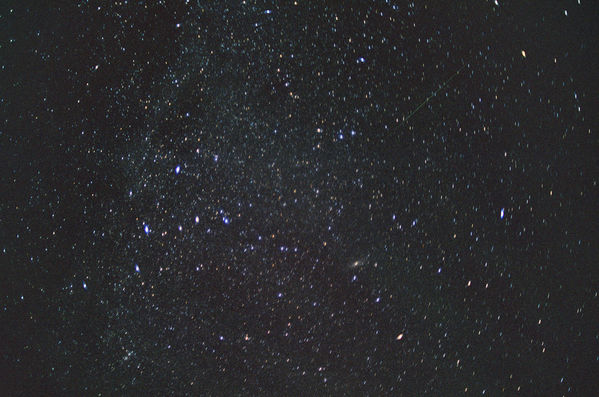
And then there was the camera. I had been trying all sorts of different exposures. I was shooting with a 35mm f1.4 lens. My exposures were a mix of whatever came to mind and when I realized that I had left the shutter open. I also did not look carefully at the f-stop and took a number of shots with the aperture shut down, which makes no sense when you want more light. I caught many planes. There is a major jet pathway that goes more-or-less over Hemet, which is north of us. So from our perspective, they are going over Cahuilla peak. Right where the Perseids would be. I did catch one Perseid.

Perseid over Anza

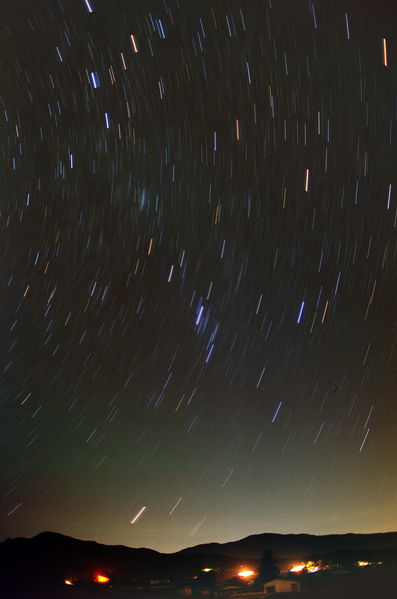
The meteor is in the upper right of the image. You can clearly see Cassiopeia and make out the Andromeda galaxy in the lower center right. I also got a very nice star trails image.

Star Trails over Anza

I really like the colors in the stars. I will be getting a piggy-back device so that I can take long-exposure very wide-field images without trails. This image has shown me what is possible up there in the mostly dark skies of the Anza valley.

Altogether, a successful meteor shower watch. I now know what to expect and can plan a more professional watching and imaging session for the next shower. Perhaps the Geminids in December. It will be chilly, but it could be nice.

Pre-Perseids

My wife’s sister and brother-in-law came out to Lake Riverside for dinner and meteor watching last night. We had blue-foot chicken that my wife had found at Surfas Restaurant Supply, found the morning after we watched “Battle Blue-foot Chicken” on The Food Network’s Iron Chef America. A bit of a coincidence, and the chicken was good. The thighs were not fat and plump like regular store chicken, and the flavor was good. Altogether a nice dinner.

I missed all the satellites from Heavens-Above, but that is not much of a loss. I got out the C-8 (with now non-functioning drive motor) and we had a small observing run. It included M57, the Ring Nebula, Albireo, and two very nice globular clusters in Scorpius, M80 and M4. M80 is a small, tight ball of stars. M4 is much larger and is visible with binoculars, as we discovered last night.

Meteor watching was OK, with my daughter reporting 16 seen over 2 hours from 10pm to midnight. I stayed up until 1am, but did not see too many more. The Milky Way was quite beautiful, and Andromeda was visible to the naked eye. Very pretty.

I hope to see more meteors tonight, and have another visual-only, manual observing run.

Mike Salway’s Jupiter Data

Mike Salway of Ice in Space posted some raw images of Jupiter he took from Australia on the Bad Astronomy / Universe today forum. Mike is the premier (in my view) planetary imager. He provided the exercise in two parts. He posted TIFFs on the first, and TIFFs and AVI sequences on the second.

My first attempt on the first image didn’t get the best results, but I did have fun using PixInsight to process the data.

Since Mike suggested Registax and Photoshop, I decided to be contrarian an use PixInsight, a currently free image processing tool. It has a pretty steep learning curve, but it provides great control over many image enhancing tools.

So, complying with your direction to share processing steps, here is what I did.

  1. I ignored the direction to align each color channel. I know this is being lazy, but there was no easy way to do it. In the final image, I don’t see differences in alignment for each channel.
  2. I combined each color image into an RGB image, factoring each color evenly.
  3. I extracted a luminance channel using “Extract Channel” in PixInsight. I used this to get to the best wavelets for the image, based on the tutorial on the PixInsight website.
  4. Finding the right parameters for the Atrous wavelet tranform, I was still not satisfied. I created a mask using a severe wavelets transform of the planet. Parameters were: Levels 8 & 9 (scale 128 & 256) bias 1.0 and 0.1 respectively. All other layers disabled. I then stretched the resulting with curves, eliminating the low end, to create the final mask.
  5. Using the mask, I applied wavelets to the entire image. The parameters were, by level: 1: off, 2: +12, 3: 0, 4:+0.8, 5:+0.6, 6: 0, 7: 0, 8:+0.3, Dynamic Range Adjust: High: 0.4
  6. Still using the mask but using it inverted, I darkened the limb of the planet. This improved the “flattened” look created by the sharpening process
  7. I applied an overall curves (no mask) that increased contrast and boosted saturation. The ability to manipulate hue and saturation in the curve dialog is a great strength of PixInsight.
  8. I used the GreyCStoration noise reduction algorithm to smooth out the noise in the image. I increased the scale of the noise to 1.2 pixels, all other parameters were default.
  9. I saved the file as a FIT (PixInsight works in 32 bit floating point, so saving in FIT saves all the data) and a TIFF for Photoshop (16 bit integer).
  10. I saved the file as a PNG from Photoshop. No manipulation with that tool. I tried an high-pass filter, but it didn’t really help.

Here is the final result:

Mike Salway Jupiter try #1

Unfortunately, while I felt that I got the contrast enhancement done well to bring out the clouds, it lacks color and has an over processed look.

For version #2, I took an approach that let to a much more subtle version.

  1. Convert the tiffs to grayscale, save as FITS
  2. Open in CCDStack, align the central region
  3. Open aligned images in PixInsight, color combine with equal weighted colors
  4. Apply a curves transform to increase the contrast, also use the unique ability in PixInsight to enhance saturation with a curve
  5. Apply a Weiner Deconvolution using the standard settings
  6. Adjust contrast with curves
  7. Color balance with the histogram tool
  8. Another Weiner deconvolution, using Std Dev of 1.5
  9. Yet another curves to add a “roundness” to the planet
  10. In Photoshop, save as a JPEG at 150% of original size

Version #2 (resized in HTML for the blog)

Mike Salway Jupiter try #1

For this third and final version, as in my other attempts, I relied almost exclusively on PixInsight. Most of the processing below was done in a 64-bit space. While the original data doesn’t have that granularity, processing with this precision eliminates any rounding errors. Hey, it might not make any difference in this case, but it is cool knowing it can be done.

Here was my process:

  1. Open each image in PixInsight, change to grayscale, save as FITS files
  2. Open in CCDStack, align based on central region, save again
  3. Color combine in PixInsight, using LRGB combine (w/o L) and an even 1/1/1 R/G/B balance
  4. Apply a curves transform, generally darkening the image
  5. Perform a Weiner deconvolution, 2.75 st. dev, 1.8 shape. This brings out the features in the planet’s clouds.
  6. Another modest curves to adjust contrast and a curve on color saturation (a PixInsight feature) to boost the color.
  7. Another modest Weiner deconvolution, 1.5 st. dev and 1.75 shape
  8. A very modest GREYCstoration noise reduction (0.2 magnitude)

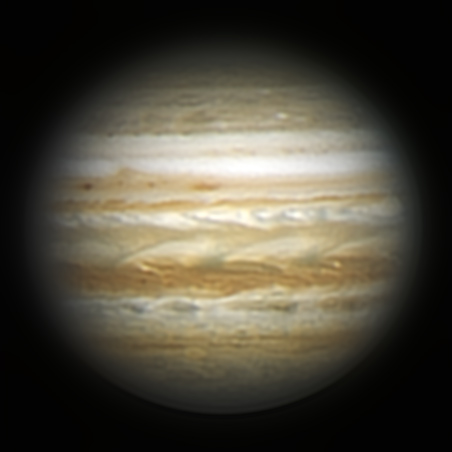
The third and final image looks like this:

Mike Salway Jupiter try #3

It was great fun working with data the quality of Mike’s. I think it may be time to upgrade my planetary camera. The ToUCam just isn’t delivering the image quality, and now I am spoiled.