Last Sunday night was a mostly clear night out in the Cahuilla valley. That provided the opportunity for some astronomy and astrophotography. The night before might have been a bit better, but it was cold with the temperature already below freezing at 9pm. Yes, that’s really that cold, but it’s awfully cold to be outside with a telescope.
Earlier in the day, I had installed the new drive motor and tested the new controller for the CG-5 mount. Everything seemed to be working fine. The first order of business was to collimate the scope. The last time I had critically looked at the collimation of the C-8 the out-of-focus view of a star was quite asymmetric. It took a good 45 minutes to get it done, but I am now confident that the C-8 is in good collimation.
The Moon was getting close to full, only two days away, so I was planning on Lunar imaging. Dew became the first problem. I believe that my prior CG-5 motor controller box was destroyed because I used a hair dryer to dry the corrector plate while the drive controller was plugged into a Radio Shack 6v transformer (not a regulated unit but a little brick). Given this, using batteries for the CG-5 drive was required.
The next problem was that my new ImagingSource firewire camera did not respond. The computer did not see it. I tested the firewire port and it was fine. Gloom. The I remembered that I did bring my trusty Phillips ToUCam Pro. I got that set up and focused on the Moon.
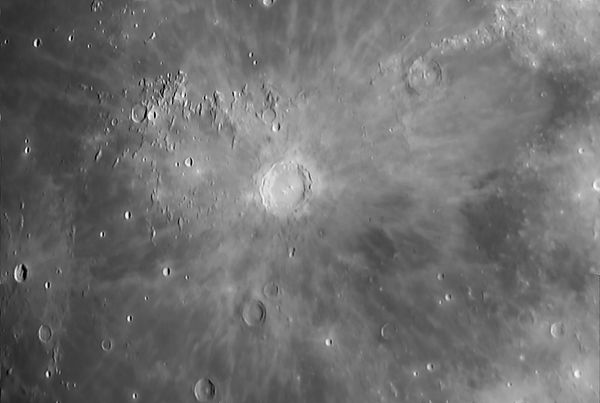
I have always wanted to try creating a mosaic. I shot four shots around Copernicus crater to create my first mosaic. I processed each AVI as consistently as possible, in the end, doing no wavelet or exposure correction in Registax. I combined the four images in Photoshop, using the built-in panorama capability. Registax had been shifting the histograms of the stacked images which made the composite uneven; I turned off that option in Registax.
After combining the images in Photoshop. I did all the processing in PixInsight (now a commercially available product!). I had to crop the image before deconvoluting the image as the white space caused errors in processing. here is the processing story.
- I changed the image format to 32 bit depth, and then doubled the pixel depth by increasing the resolution. Even though this added no data (and probably introduced noise), I could not get decent deconvolution results at the lower resolution.
- The combined image had some strange color tints to it, probably the result of creating the mosaic. I extracted the luminance and worked with that.
- I then used the Regularized Van Cittert deconvolution algorithm in PixInsight to sharpen the image. The tutorial they have is excellent. I used a standard deviation of 2.75 and a shape of 1.5, with standard noise reduction and a 0.15 increase on the highlight in dynamic range extension. That final bit was important so I did not clip the bright areas during deconvolution. This step was the key step in creating the image.
- The next step is where I created two versions with different contrast profiles. On the first, I applied a default HDRWavelet transform to the image to bring up the dark areas without clipping the whites. In the end, this led to a more even image overall, but one with more contrast in the details. On the second, I skipped the HDRWavelet transform.
- On both versions, I applied a moderate noise reduction with GREYCstoration and a final tweak to the contrast with curves.
- Final steps were to shift to 16 bit integer, then move to Photoshop to save as web size.
This is version 1, with a sharper contrast in the details, but flatter overall.

The second version is here. It is a bit softer in contrast.
I’d be curious to see which version people like better.
Pingback: Copernicus Mosaic - Bad Astronomy and Universe Today Forum