Mike Salway of Ice in Space posted some raw images of Jupiter he took from Australia on the Bad Astronomy / Universe today forum. Mike is the premier (in my view) planetary imager. He provided the exercise in two parts. He posted TIFFs on the first, and TIFFs and AVI sequences on the second.
My first attempt on the first image didn’t get the best results, but I did have fun using PixInsight to process the data.
Since Mike suggested Registax and Photoshop, I decided to be contrarian an use PixInsight, a currently free image processing tool. It has a pretty steep learning curve, but it provides great control over many image enhancing tools.
So, complying with your direction to share processing steps, here is what I did.
- I ignored the direction to align each color channel. I know this is being lazy, but there was no easy way to do it. In the final image, I don’t see differences in alignment for each channel.
- I combined each color image into an RGB image, factoring each color evenly.
- I extracted a luminance channel using “Extract Channel” in PixInsight. I used this to get to the best wavelets for the image, based on the tutorial on the PixInsight website.
- Finding the right parameters for the Atrous wavelet tranform, I was still not satisfied. I created a mask using a severe wavelets transform of the planet. Parameters were: Levels 8 & 9 (scale 128 & 256) bias 1.0 and 0.1 respectively. All other layers disabled. I then stretched the resulting with curves, eliminating the low end, to create the final mask.
- Using the mask, I applied wavelets to the entire image. The parameters were, by level: 1: off, 2: +12, 3: 0, 4:+0.8, 5:+0.6, 6: 0, 7: 0, 8:+0.3, Dynamic Range Adjust: High: 0.4
- Still using the mask but using it inverted, I darkened the limb of the planet. This improved the “flattened” look created by the sharpening process
- I applied an overall curves (no mask) that increased contrast and boosted saturation. The ability to manipulate hue and saturation in the curve dialog is a great strength of PixInsight.
- I used the GreyCStoration noise reduction algorithm to smooth out the noise in the image. I increased the scale of the noise to 1.2 pixels, all other parameters were default.
- I saved the file as a FIT (PixInsight works in 32 bit floating point, so saving in FIT saves all the data) and a TIFF for Photoshop (16 bit integer).
- I saved the file as a PNG from Photoshop. No manipulation with that tool. I tried an high-pass filter, but it didn’t really help.
Here is the final result:

Unfortunately, while I felt that I got the contrast enhancement done well to bring out the clouds, it lacks color and has an over processed look.
For version #2, I took an approach that let to a much more subtle version.
- Convert the tiffs to grayscale, save as FITS
- Open in CCDStack, align the central region
- Open aligned images in PixInsight, color combine with equal weighted colors
- Apply a curves transform to increase the contrast, also use the unique ability in PixInsight to enhance saturation with a curve
- Apply a Weiner Deconvolution using the standard settings
- Adjust contrast with curves
- Color balance with the histogram tool
- Another Weiner deconvolution, using Std Dev of 1.5
- Yet another curves to add a “roundness” to the planet
- In Photoshop, save as a JPEG at 150% of original size
Version #2 (resized in HTML for the blog)

For this third and final version, as in my other attempts, I relied almost exclusively on PixInsight. Most of the processing below was done in a 64-bit space. While the original data doesn’t have that granularity, processing with this precision eliminates any rounding errors. Hey, it might not make any difference in this case, but it is cool knowing it can be done.
Here was my process:
- Open each image in PixInsight, change to grayscale, save as FITS files
- Open in CCDStack, align based on central region, save again
- Color combine in PixInsight, using LRGB combine (w/o L) and an even 1/1/1 R/G/B balance
- Apply a curves transform, generally darkening the image
- Perform a Weiner deconvolution, 2.75 st. dev, 1.8 shape. This brings out the features in the planet’s clouds.
- Another modest curves to adjust contrast and a curve on color saturation (a PixInsight feature) to boost the color.
- Another modest Weiner deconvolution, 1.5 st. dev and 1.75 shape
- A very modest GREYCstoration noise reduction (0.2 magnitude)
The third and final image looks like this:
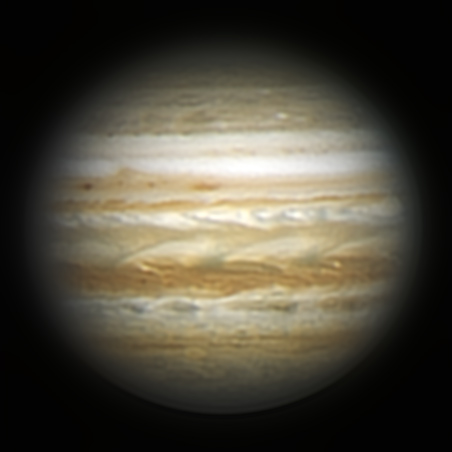
It was great fun working with data the quality of Mike’s. I think it may be time to upgrade my planetary camera. The ToUCam just isn’t delivering the image quality, and now I am spoiled.