Cub Scout Night

We hosted a Cub Scout troop tonight at our house and the observatory (in Los Angeles). Some friends of ours son is a member of the troop and they asked us to help with a night of astronomy focused on getting the troop members their Astronomy Belt Loop.

It was great fun and I think a great success. We had 6 Scouts, parents, and a sister as our guests. After they completed their opening ceremonies, my wife went through the specific learning about astronomy that is required for the belt loop (what is a planet, etc.). Once it was dark — well, time for a digression. It is dark a bit late this time of year because of the early start of daylight savings. It is starting too early. End of digression.

I had opened the observatory at the start of the meeting. Good hoots and hollers from the scouts at the opening. Once it was dark and the lessons were complete, we started observing.

Mars was first and was not too exciting. In the 8″ SCT and a 9mm Nagler (225X magnification), it was just a small disk with almost no features. We were pushing the seeing in any case.

The next target was M42, the Nebula in Orion. The Trapezium was a clear four stars and there was a nice haze of nebulosity around it. This got a few aahs from the Scouts and other guests.

We then moved on to the Moon. This turned out to be the hit of the night. In the 35mm plossl, it was a full disk view with the terminator right in the middle of the Moon. Great detail in the maria and the peaks. Lots of oohs and aahs. I then went back to the 9mm Nagler for a closer look and this brought some serious study by one of the Scouts. Aimed at the north pole of the Moon, we had a view that showed the shape of the Moon with lots of crater detail. A big hit.

We had reached 8:40 pm or so, so the troop left except for our friends and their son. We chatted a bit and were looking at the constellations (we could pick out Orion, Gemini, Leo, Canus Major [Sirius anyway], and the Big Dipper). Then I saw a bright object at about 25 degrees and realized we had a jackpot view — Saturn!

Saturn was low but we could see the rings well and two moons clearly, Rhea and Titan. Saturn is always a big hit. So we finished the night on a high note.

It was really nice to be able to share both the knowledge of Astronomy and the experience of looking through the telescope with a bright and eager group of kids. Well behaved too. They were all very thankful. And I am very thankful that I had the ability to share the view of the sky with them.

Moon Mosaic Creation

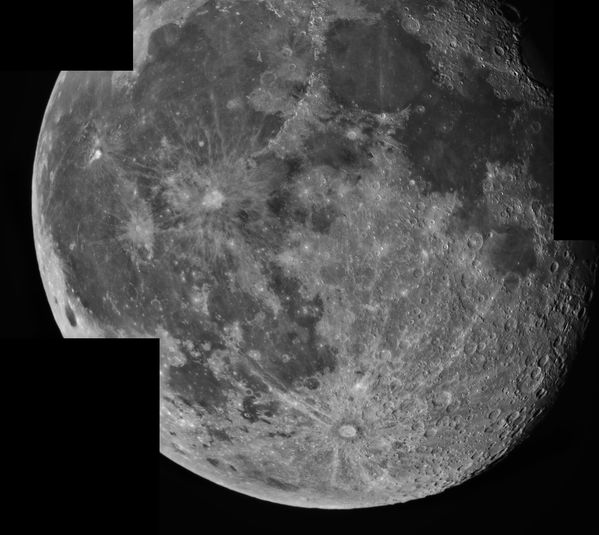
Back over the holidays, we had a clear night but the Moon was out — almost full. After taking some Ha images of M1, I decided to try the Moon itself. It turns out that with the C-11, the new 0.75 focal reducer from Optec, and an Ha filter, a 0.11 second exposure is not blooming or over saturated on the ST-10.

So I took three series of images, one of 20 and two of 40 exposures. February’s Sky and Telescope has a very good article Lunar Photography with AviStack. Based on the advice there, I used AviStack to align and stack the images. I then took them into Photoshop where I used the Photomerge feature to create a mosaic of the three images. Here is the raw image.

Raw Moon Panorama

Raw Moon Panorama

The next group of steps were performed in PixInsight. I will go through how I used mask and several of the image enhancement functions to produce my final image.

The first step in processing was to change the areas that weren’t part of the Mosaic from white to black. To do that, I cloned my original image by dragging the name tab onto the desktop. I used the histogram tool on the cloned image, moving the black point almost all the way to the top. I then inverted the image, producing a white background with the missing corners black. Using Pixel Match, I created a new image that was the minimum of the original image and the black corners.

The next thing I needed was a mask that would allow me to apply deconvolution, A Trous Wavelets, and HDR Wavelets to the image without creating artifacts around the edge of the Moon. I cloned my new image and reduced it to almost pure black and white using the Histogram tool, moving the white and black points to just above the background sky glow. This gave me a sharp-edged mask, but what I needed was a smoother edged mask. Without a gaussian blur function, I used A Trous Wavelets to blur the image. Here are the settings I used to blur the mask (click on the image for a larger view):

Wavelets Setting to Blur Mask

Wavelets Setting to Blur Mask

This produced the following mask image. The basic idea is that you set wavelets to many levels, drop the lower levels and slightly increase the bias near the top level.

Moon Mask

Moon Mask

With this mask set on my main image, I went through key image enhancement steps with minor curves adjustments in between each. My first step was deconvolution. I had found that larger standard deviation settings brought out noise in the image, with single pixels leaping in brightness. After trial and error, I settled on a standard deviation of 1.5 and 80 iterations of Regularized Richardson-Lucy deconvolution. Here are the settings I used.

Deconvolution

This had the effect of subtly sharpening the details of the Lunar surface. While this was good, I wanted to expose more of the details in this image. So at this point I turned to A Trous Wavelets. I didn’t want to over-process the image (although some might argue that doing wavelets on top of deconvolution is already that) but I wanted more detail. I applied the following, somewhat subtle, A Trous Wavelet transformation.

Sharpen Wavelet

From there I wanted the global contrast change that you get from HDR Wavelet transformation. Note that for all of the prior sharpenings, I have been using my mask. For this transformation, I needed a sharper edge to the mask and even that left behind some brightness I needed to fix. Here is the HDR Wavelet setting I used. The number of layers is one greater than the default of 6. This matched the scale where I wanted the contrast adjustment.

HDR Wavelet

This process did leave a minor artifact. The mask left a somewhat bright area around the lower edge of the Moon. Rather than tweak the mask again, after applying a very light noise reduction using ACDNR, I took the image into Photoshop. In Photoshop, I burned the lower edge of the Moon very slightly. I also added black shapes around the missing mosaic area to hid the edge artifacts from the A Trous wavelet processing.

This is the final image:

Moon Mosaic

Bubble Nebula & Ha LRGB Processing

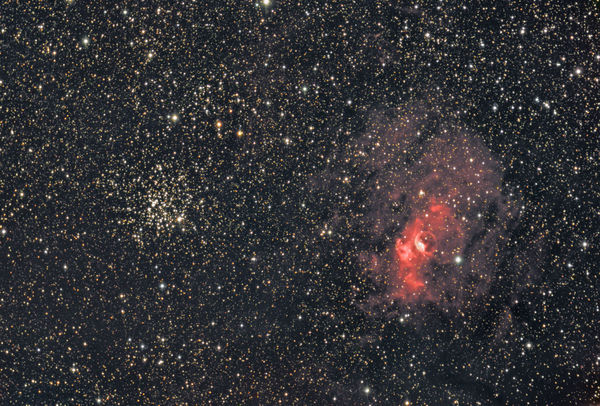
Back in October, I took some data of the Bubble Nebula (NGC 7635) and open cluster October Salt and Pepper (NGC 7634). I took 180 minutes of data:

  • 90 minutes Hydrogen Alpha (Ha) in 9, 10-minute sub-exposures unbinned
  • 30 minutes Luminance in 6, 5-minute sub-exposures unbinned
  • 60 minutes, 20 each of Red, Green, and Blue in 2, 10-minute sub-exposures binned 2×2.

I’ll start with the finish. Here is the final image. (Click on the image for a larger version in the gallery.)

Bubble Nebula and Friend

While I do think this is a nice image, it does have the pale salmon reds typical of Ha LRGB processing in basic combine method I used. My basic approach was to make an Ha-Luminance image which was then combined with the RGB to produce the final image. This started off all right as the HaL image looks fairly good. I created the image by adding 3 times the Ha to the Luminance using Pixel Math (most processing was done in PixInsight). I used both HDR Wavelets and A Trous Wavelets to sharpen up the image. Here is the HaL image used to create the final.

Bubble and Friend (Ha - Luminance)

I then created an RGB image, adding 3 times the Ha to the red before combining with blue and green. I processed the image, stretching with histogram and curves to end up with a final RGB image. I brought both the Ha-Luminance and the RGB into Photoshop, pasting the Ha-Luminance on top of the RGB and changing the blending mode of the pasted layer to luminance. There was a lot of noise in the color image, with hot pixel color spots from each different color. Selecting the bottom, color layer, I used the spot healing brush tool to clean up the bad spots. This worked very effectively underneath the luminance layer, since only the spurious color was removed, not the details in the image. I now regret that I didn’t save a separate layer version of the image at this stage. Given the results, I figured I would go back to the beginning (and I still may).

I spent a fair amount of time tweaking the color balance, and passed the image through PixInsight’s GREYCstoration noise reduction algorithm.

Since the original processing, I have tried PixInsight’s “A New Approach to Combination of Broadband and Narrowband Data,” but my color data binned 2×2 is too noisy for it to work. I may yet try Rob Gendler’s approach. At this point, I think I am tired of working on this image.

One lesson learned from this is that when one is doing narrowband imaging, it is better to get full resolution color. This provides better data to use when creating the final image, and allows the luminance combine that creates the peachy / salmon red tones. I got better results on the Heart Nebula, but I’m not done processing that one so it will be another post.

I did try a highly stretched Ha-Luminance image to see what detail I could get out of the image. This is stretched very hard and it has brought out the noise, but there is a lot of detail in the image. This is created from the maximum of 5 * Ha or the Luminance image in Pixel Math, then stretched with curves and some blackpoint adjustment in the histogram tool. I did average in an HDR Wavelet and A Trous Wavelet to enhance the detail in the nebula. Click for a bigger image as the thumbnail is pretty small.

Bubble and Friend (Ha-Luminance)

A Plug: 400 Years of the Telescope

I received an e-mail from Carla Befera, who is doing national PR for 400 Years of the Telescope, a show coming up on PBS. She asked me to put in a plug for the show so my readers would know about it. It looks really good. It may have aired in your area as the general release was April 10, but it is on this Thursday, April 16 at 7pm on KCET in Los Angeles.

Here is the blurb from the press release:

This visually stunning program chronicles a sweeping journey, from 1609, when Galileo revealed mankind’s place in the galaxy, to today’s thrilling quests to discover new worlds in the universe. Narrated by NOVA’s Neil deGrasse Tyson, the compelling program takes viewers on an adventure through the heavens and around the globe, visiting the world’s leading astronomers, cosmologists and observatories.

I did let Carla know that I’m not sure how many readers I have. I am tickled pink that I even showed up on the radar! And I am certainly willing to put in a plug for what looks to be an excellent program.

UPDATE

It appears that the show will be on KCET on Thursday April 30th at 9pm. The earlier broadcast date is for “KCET World,” whatever that is. The KCET website is full of bugs too. Links don’t work, information is incomplete. Poorly executed. But this still looks like a good show.

NGC 2403 Revisited

This is a new version of an image I took back in January 2007. I spent two nights capturing data, but I have never been satisfied with the original processing. I have finally have gotten around to trying again.

On preliminary comment in self-defense here. This is a difficult object, even under dark skies. It is diffuse, with the broader areas quite dim. I was imaging in West Los Angeles, with very light-polluted skies. Much of the galaxy is only slightly brighter than the background sky glow in the city. I may have taken eight hours of data, but seeing was not that great and the signal was barely above the background.

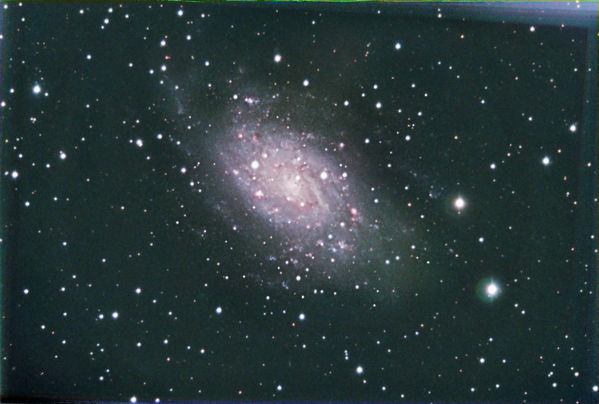
Here is the original image. It has many flaws. First, it is mirror-flipped so the orientation is incorrect. It should have been cropped before it was processes to eliminate the lines all around the edges. It is stretched too hard and looks over processed.


NGC 2403 Original Version

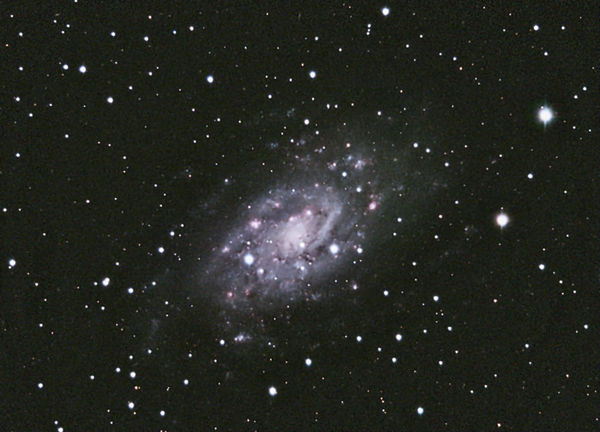
Here is the revised image.

NGC 2403 Revised Version

I was much less aggressive on stretching the image. Image reduction (darks and flats) was done in Maxim DL. I aligned and stacked the images in CCDStack. I found that the bicubic b-spline resampling produced the least noise in the align process. I used mean combination to combine the subframes. Technique-wise, I created a master luminance frame and then used that to align the R/G/B frames.

Most of the processing was done in PixInsight. I did most of the enhancement work was done on the luminance image. I cropped the image, rescaled it to use the full dynamic range. This was required since the signal was very low and I had combined with a mean combine rather than a sum. A sum would have produced higher totals, but the net result is the same as a mean. I stretched the image with historgram, but did not clip it but for a small amount at the lower brightness levels.

I did try to do most of the processing on a linear version of the image, per the advice of the experts from PixInsight. While I was able to more easily get a star mask built, HDR Wavelet and other functions just didn’t work well.

With the image stretched appropriately, I copied it and did an HDR wavelet transform with a star mask applied. This was averaged with the original image. That was essentially the final luminance image.

For the RGB frames, I did a similar stretch process, attempting to create similar-looking histograms for each one. I then combined all frames into a color image using LRGB combination. I brought that image into Photoshop to adjust the color balance and then used Russ Croman’s Gradient Xterminator to flatten the background. Finally, back into PixInsight for some brightness touch up and noise reduction.

The exposure is LRGB 8 hours, 10 minutes total exposure, L = 115 min (23×5 min) + RGB 375 minutes, RGB = 125 min (25×5 min), all unbinned. The equipment: C-11 @f5.95, CGE mount, ST-10, CFW-8A, AO-7, & Hutech LPS Filter.

AIC 2008 Recap and Photos

AIC 2008 wrapped up just over a week ago. It was a good conference, fairly different in content and organization than prior years. The core of the conference did not focus all that much on astrophotography, but rather on general space science, publishing, and 3-D rendering. I suppose it was good to get general theory rather than cookbook demonstrations as it has been in the past. From an astrophotography standpoint, the sessions on Friday were quite good. This balanced the more general content of Saturday and Sunday with smaller group sessions on tools and techniques.

As always, it was good to see friends from prior conferences and talk about imaging, observatories, and equipment. The vendor section was quite good, with more vendors than last year. I am now again interested in pursuing Hyperstar imaging given a very convincing discussion with the folks at Starizona. My current dream scope is a Planewake CDK 12.5. But the observatory comes first.

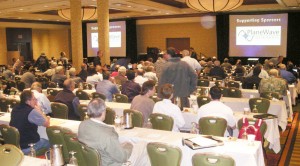
Here are some photos of the conference. This first is a shot of the main conference area.

AIC 2008 Meeting Room

AIC 2008 Meeting Room

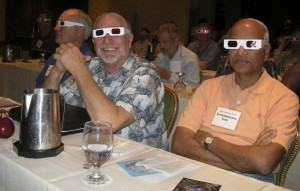
Bud Guinn and Venkata model the 3-D glasses we were given for the 3-D rendering presentation.

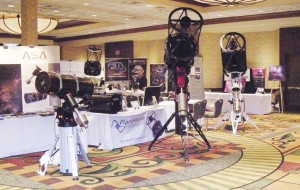
Astro-Physics, Planewave Instruments, and ASA telescopes provided an impressive display.

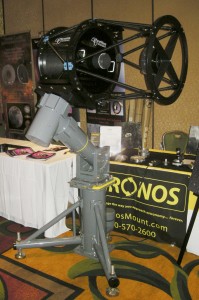
The Chronos Mount is an intriguing product. It uses harmonic drives and is an equatorial mount that does not require a meridian flip.

I’m already looking forward to next year’s meeting. I would like to see some presentations on the math behind image processing.

AIC 2008 Live Blog Sunday

08:00 PST — Start of the final day at AIC. Last night included a demo of Light Buckets, an on-line telescope service. Charges add up quickly as it is from $80 to $175 per hour. Next year’s conference is set at the end of October. It will be larger, they have reserved the upstairs room. Bigger and better.

Ray Gralak Advanced Image Combine Techniques CCD usage, starting in 90s. CCD stacking led to great dynamic range, DDP made it visible, but artifacts in the image came out. These are cosmic ray hits, hot/cold pixels, bad columns, satellite trails, plane trails, and asteroids. Four raw image types: Bias, Dark, Flat, and Light frames. Dark and Bias frames may change over time. Data collection tips: Take all frames at the same temperature, take the same number of darks as lights, use light frame duration for darks, dither your lights and flats, flat frames should be at or near focus and at the same orientation of the light frames, a flat for each filter. Workflow: Create master Bias, master dark, subtract bias from each flat, normalize and combine flat frames, subtract master dark from light, apply flat, align and combine.

Combine methods: Average, median, min / max clip, sigma, SDM. Average, good SNR, but artifacts remain. Median, best noise rejection, but lower SNR. Min/Max, rejects most artifacts, but leaves some, must have >6 images. Sigma Clip, strong noise rejection, requires >10 images to work best, does make errors to reject good or not reject bad. SDM, calculates mean and median, then looks at standard deviation of all pixels, if STD is above a certain number, it uses median, otherwise uses mean. Multiply a sigma factor to select “certain number,” if sigma factor is zero, all pixels are rejected and the mean is used. Lost of detail on settings (I took a picture).

09:00 PST — Wolfgang Promper Making the Most of Your Site This is a topic for me, about imaging from an urban location. I get it! We should image where we can do it more often. Normalize background: Equal pixel counts on background in each channel. Interesting, he cuts out of Maxim and pastes into Photoshop. Gradient Xterminator as primary gradient removal, then manual tweaking of the image. High pass and threshold to find the stars (SSRO has instructions). Add stars as new color channel with cut and paste to use the channel as a selection, expand and feather selection by 2 pixels, 2 pixel minimum filter to reduce size of stars. Use extensive selective color to balance nebular color. DDP 100 lower than auto. “After a lot of processing and versions you often find that the first version was the best.”

09:32 PST — Break

10:00 PST — Door Prizes! Art won a telecompressor!

10:30 PST — Conference Over

AIC 2008 Live Blog Saturday

Today (November 15th) is the second day of the Advanced Imaging Conference (AIC) in San Jose, California. We’ll see how well I can keep up the live blog.

Friday was a very good day. I attended workshops on image processing programs PixInsight and CCDStack and observatory automation programs CCDAutoPilot and ACP. All very interesting. The CCDStack presentation from Stan Moore was particularly good. He covered data rejection techniques in detail. I have still not decided between CCDAutoPilot and ACP. ACP seems more robust, but there are some very cool features (auto G2V calculation, strong dithering algorithm) in CCDAutoPilot.

08:30 PST — We are under way. Tim Ferris awarded the 2008 AIC Hubble Award for creating the film, Seeing in the Dark. Commenting on the creation of films, how many are resistant to technology. The old 24 fps story. HD is shot at 30 fps. Now on to shallow focus. Another technical artifact of slow color film. People become stuck in the past. They used special effect techniques in the film to, among other things, make stars twinkle. This looks like an excellent film.

09:30 PST — John Gleason, A Celebration of Ha Imaging. Absolutely astounding narrowband images. Well, the ST-10 is good for Ha. Standard advice, expose, expose, expose. Live processing demo! A real risk taker. Extensive non-linear stretching of the image with curves, some clipping using histogram. 3-picel minimum filter “Continuum subtraction.” Use noise reduction to clean up noise from filter. Days of processing, lasso, feather of 100, curves and levels on selected areas. Analogous to burning and dodging. Relies on very deep exposure, lots of dynamic range. This allows extensive processing. It is interesting that there is no use of special tools, just lasso, curves, and levels. A great result.

On to Australia. Out in the outback with the Milky Way illuminating the ground. Sounds beautiful. Down there you have the galaxy right overhead. Many Ha targets.

10:30 PST — Break Time

11:00 PST — Michael Backich, Senior Editor and Astronomy Magazine. What a Photo Editor Wants Picture selection depends on the story, not pro or amateur. And the editor is god when selecting photos. Best submissions are e-mailed, TIFF, and highest resolution you have. Make the subject of the e-mail with only the object identifier. At www.Astronomy.com/astroimages provides information on what has been published for the last several years. Try something that hasn’t been done or that hasn’t been done recently. Also add descriptions, emphasis on “only,” “last,” “first,” and the like. Also, interesting things: Good double stars, variable starts, showers, comets, etc. Same object, different wavelengths. Simple camera, star trails shots. Astronomy will be starting an on-line reader gallery. Starting an e-mail list, will put out announcements, requests for images. E-mail Michael.

11:45 PST — Lunch

13:00 PST — Vendor Presentations

SBIG: new STX Cameras, standalone autoguider, new all-sky camera — color and daylight.
Software Bisque: The Sky X — multi-platform, 50x performance improvement, reduce separate applications, simplify installation. Professional version mid-2009. AP support!
RCOS (Adam Block presenting): Big 24″ scope. Clearly an amazing scope.

13:35 PST — Alex Filippenko, UCB — Dark Energy and the Runaway Universe Do you believe that people mistake Cosmology and Cosmetology? A good and entertaining presenter, probably a good professor too. Zwicky: “Spherical bastards: bastards anyway you look at them.”

14:30 PST — Break

15:00 PST — Ron Wodaski Tzec Maun Foundation 50′ steel dome in New Mexico. A foundation to provide free internet access to telescopes for students and researchers. The foundation will be providing a scholarship to AIC 2009.

15:25 PST — Sean Walker, Imaging Editor, Sky & Telescope, Collaborative Imaging One partner from Sky and Telescope, the other a great amateur telescope maker. WinJUPOS, plot positions of the major planet features. Can import and flatten your images. Sean created an amazing picture map of Mars, and another of Venus. The Venus image is really unprecedented.

16:00 PST — Chris Ford, Pixar, Astronomy in 3d Constrained: Fixed to real images, Unconstrained, able to visualize. The latter open to all artistic license. The talk is on the former. Amazing 3d visualization of astro images. Very interesting, but not for me for quite a while. It’s enough to do regular processing.

17:05 PST — Close up the live blog for the day.

First CCD Image from Lake Riverside

It has finally been achieved. After almost two years, on April 11, 2008, I took a CCD image from Lake Riverside. This took quite a while because I have a full observatory set-up in Los Angeles. So going to a temporary set-up again was a big leap, even to get to darker skies. After all, I do admit to being lazy.

I got up to LRE on Friday afternoon. There was a good wind blowing from the east, but the weather was otherwise pleasant with the temperature in the low 70s. I took care of the yard chores and as soon as the Sun got low I began taking out the equipment. I wanted to wait for the Sun to be fully down before I took out the OTA (optical tube assembly) since I wanted it to be as cool as possible. I had selected the driveway in front of the garage as my location because it was shielded from the east wind.

There is a fair amount of equipment involved:

  • Tripod, with spanner
  • Mount, with computer assembly, mount proper, and counterweights
  • Telescope (or OTA) with dew shield
  • Focuser (TCF-S), controller box and power supply
  • Dew heater and controller
  • 12 volt power supply for mount and dew heater
  • Camera (ST-10 w/CFW-8 and AO-7) and power supply
  • Table
  • Computer, with power supply and wireless rumblepad to control the mount
  • USB hub with power supply
  • USB to serial adapter (Keyspan)

Once that is all set-up, then I have to connect the mount to the PC. Then software configuration: The Sky to NexRemote, Maxim DL to The Sky, the camera, and the focuser, and Focus Max to the focuser and the Sky. The mount needs to be aligned, polar aligned, and aligned again. This took over an hour.

I had settled on NGC 3628 because it is an interesting object in the southeast sky with an excellent magnitude 7.1 guide star. It took about 45 minutes to get the object framed with the guide star on the guide chip, the scope focused, and the shot set-up. By that time is was 10:25pm and NGC 3628 was going to transit (cross the meridian) at 10:45. I decided to take a couple of 5 minute luminance shots anyway.

I went in the house for a few minutes and when I came back (on the phone with my wife) the wind had come up. Only now it was coming from the northeast, not the east and it was buffeting the mount. Two ruined shots, one I ultimately used. And some despair that the wind would ruin the entire night.

After the meridian flip, I tried to get the “acquire star” functionality in Focus Max to work but it wouldn’t. It did not report an error, it just said that it failed. I got it to plate solve and synch the scope, but not acquire a star. This is really a great focus feature when it works. It will find a near-by star, center the star on the CCD, focus, and return to the object. Excellent automation. This work on Focus Max pushed the time to 11:30, but the wind had subsided.

I set up an imaging run of 12 five minute luminance shots and 4 five minute red, green, and blue images. I then went inside out of the cold, as it had fallen to the low 50s by this point. The wind was mostly calm. I checked the process several times, and everything seemed OK. The bright guide star allowed me to use 0.07 second guide shots, running the AO-7 at about 12 Hz. Then, at about 12:15, the back door banged from a gust of wind. When I went outside, a northeast wind was really coming up. The current image was worthless, the last two prior were lost as well. I decided to end the imaging session.

First, I had to shoot flats. I put a pillow case over the front of the OTA and got my flats with light reflected off of the garage. The wind kept rising, so I began to get a little frantic getting everything taken down. Scope shot down and disconnected, camera disconnected and into the house, cables off, OTA off and into the house, PC inside, counterweights off and into the shop, miscellaneous stuff into the shop, finally, the tripod, mount, and table into the garage. Whew.

By this time it was blowing at least 25 to 35 miles per hour. The rest of the night was very noise as the wind kept up, with gusts over 45 miles an hour. It stayed windy until I left at noon on Saturday.

I ended up with 50 minutes of exposure time. 25 minutes of luminance, 10 minutes of red and green, and 5 minutes (only one shot!) of blue. The RGB shots were binned 2×2. The final result doesn’t have a lot of detail, and it is fairly noisy, but the milestone of the first shot from Lake Riverside has been achieved.

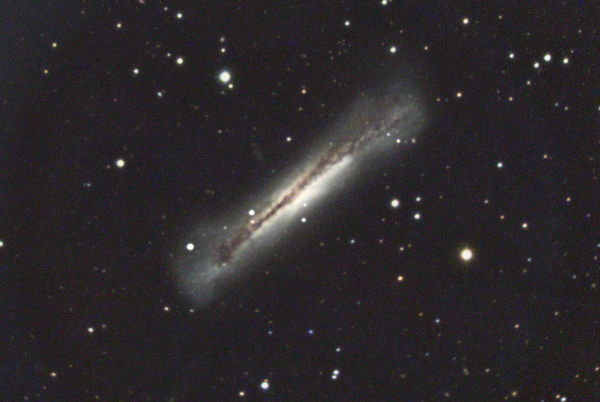
NGC 3628 is a spiral galaxy in the constellation of Leo. It is one of the Leo Triplet group of galaxies. NGC 3628 is about 35 million light years away. You can click on the image for more information.


NGC 3628 - Spiral Galaxy in Leo