Back over the holidays, we had a clear night but the Moon was out — almost full. After taking some Ha images of M1, I decided to try the Moon itself. It turns out that with the C-11, the new 0.75 focal reducer from Optec, and an Ha filter, a 0.11 second exposure is not blooming or over saturated on the ST-10.
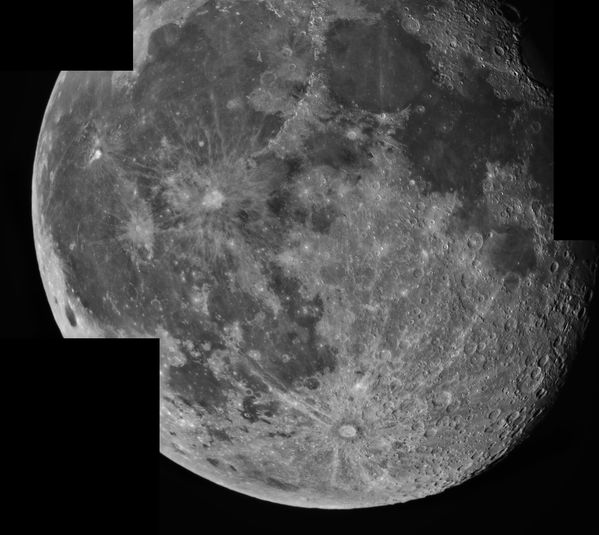
So I took three series of images, one of 20 and two of 40 exposures. February’s Sky and Telescope has a very good article Lunar Photography with AviStack. Based on the advice there, I used AviStack to align and stack the images. I then took them into Photoshop where I used the Photomerge feature to create a mosaic of the three images. Here is the raw image.

Raw Moon Panorama
The next group of steps were performed in PixInsight. I will go through how I used mask and several of the image enhancement functions to produce my final image.
The first step in processing was to change the areas that weren’t part of the Mosaic from white to black. To do that, I cloned my original image by dragging the name tab onto the desktop. I used the histogram tool on the cloned image, moving the black point almost all the way to the top. I then inverted the image, producing a white background with the missing corners black. Using Pixel Match, I created a new image that was the minimum of the original image and the black corners.
The next thing I needed was a mask that would allow me to apply deconvolution, A Trous Wavelets, and HDR Wavelets to the image without creating artifacts around the edge of the Moon. I cloned my new image and reduced it to almost pure black and white using the Histogram tool, moving the white and black points to just above the background sky glow. This gave me a sharp-edged mask, but what I needed was a smoother edged mask. Without a gaussian blur function, I used A Trous Wavelets to blur the image. Here are the settings I used to blur the mask (click on the image for a larger view):

Wavelets Setting to Blur Mask
This produced the following mask image. The basic idea is that you set wavelets to many levels, drop the lower levels and slightly increase the bias near the top level.

Moon Mask
With this mask set on my main image, I went through key image enhancement steps with minor curves adjustments in between each. My first step was deconvolution. I had found that larger standard deviation settings brought out noise in the image, with single pixels leaping in brightness. After trial and error, I settled on a standard deviation of 1.5 and 80 iterations of Regularized Richardson-Lucy deconvolution. Here are the settings I used.

This had the effect of subtly sharpening the details of the Lunar surface. While this was good, I wanted to expose more of the details in this image. So at this point I turned to A Trous Wavelets. I didn’t want to over-process the image (although some might argue that doing wavelets on top of deconvolution is already that) but I wanted more detail. I applied the following, somewhat subtle, A Trous Wavelet transformation.

From there I wanted the global contrast change that you get from HDR Wavelet transformation. Note that for all of the prior sharpenings, I have been using my mask. For this transformation, I needed a sharper edge to the mask and even that left behind some brightness I needed to fix. Here is the HDR Wavelet setting I used. The number of layers is one greater than the default of 6. This matched the scale where I wanted the contrast adjustment.

This process did leave a minor artifact. The mask left a somewhat bright area around the lower edge of the Moon. Rather than tweak the mask again, after applying a very light noise reduction using ACDNR, I took the image into Photoshop. In Photoshop, I burned the lower edge of the Moon very slightly. I also added black shapes around the missing mosaic area to hid the edge artifacts from the A Trous wavelet processing.
This is the final image:
Like this:
Like Loading...




You must be logged in to post a comment.