Notes on Imaging M63

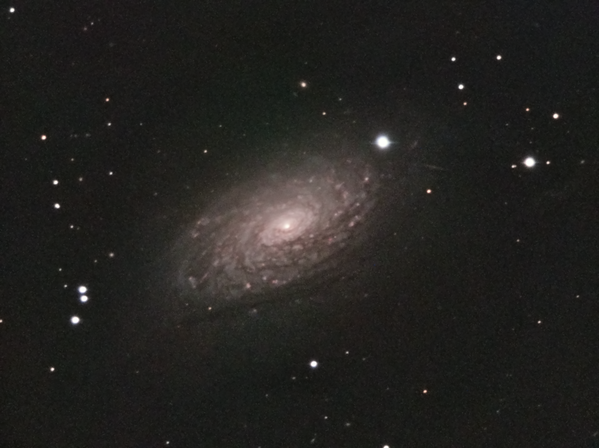
Back on May 12th, the Mar Vista Clear Sky Clock was predicting a nice evening, so I set out to do a night of imaging. After a bit of searching using The Sky and CCD Navigator, I settled on M63, the Sunflower Galaxy in Canes Venatici.

One of the major struggles was finding an object with an adequate guide star. The brighter the guide star, the more frequent the guiding using the AO-7, and the sharper the image. The brightest star in a usable location for M63 is magnitude 9.83 — really quite dim. It required 1 second guide exposures, longer than I have done with the AO-7 and the C-11.

The day was quite hazy, poor transparency in astro-speak. But poor transparency often is accompanied by good seeing so I went ahead anyway. I got the camera set-up, the scope aligned, focused, found the guide star, etc. and started imaging around 9:40pm.

I took 5-minute clear filter shots and 3 minute R/G/B shots binned 2×2. The poor transparency made the effects of the severe local light pollution worse. The shorter RGB shots reduce the impact of sky glow on the image.

The clear filter does not block the near infrared light (NIR) that a luminance filter would block. I have been using the clear filter based on comments I read to the effect that one can get good data in the NIR so I have been imaging with a clear rather than a luminance filter. That being said, in this case it is a moot point because I am also using a Hutech light pollution filter which blocks the NIR. In the process of writing this post, I found an article by Don Goldman concluding that, for galaxy imaging, one should use an L filter. But I digress.

The imaging went fairly easily. The temperature was stable, staying at about 50 degrees. If the temperature falls too fast, one needs to refocus frequently. I use Astrodon parfocal filters so I do not need to refocus between each filter. The galaxy transited at 10:51pm. I stopped imaging and took a set of flats. When I was rotating the camera to get the guide star back, I felt the clutches slip a little bit, so I needed to shut things down and restart the scope with a “last alignment.” The pointing was OK, but I forgot to turn PEC back on, so the guiding for the two clear images taken after the meridian flip was not that good. That was the one GRRRR moment during the image. I finished up late, after 2am, took the final set of flats and went to sleep.

It took a while to get around to processing the data. I left the following Monday for a week in Dublin for a business meeting, so there was no time to work with the data until I got back. Here are my processing steps:

  1. Apply darks, flats, and biases to all frames (there were 51, 18 clear, 11 each RGB, but I had to throw out one blue image because of a satellite pass) in Maxim DL
  2. Remove blooms from the images using Ron Wodaski’s bloom remover plug-in in Maxim DL. I tried to use the bloom remove in CCDStack, but it does not work for me.
  3. Aligned, sigma-rejected, and combined (summed) each set of clear and RGB images and then the final LRBG images using CCDStack.
  4. In PixInsight, I stretched the image to bring out the galaxy (a raw FITS file fresh from the camera need contrast stretching to make the object, stars, etc, visible). I used dynamic background extraction to extract the gradient from light pollution in each image and then used pixel match to subtract it from the base image. Note: If you are not careful and use the default 2x downsample in background extraction, you can end up with half sized final images. I tried the automatic background extraction, but the dynamic process worked much better.
  5. I then color combined the object in PixInsight. This involves creating a blank RGB image of the appropriate resolution, and using the LRGB combine process to create the combined image.
  6. Using the PixInsight histogram stretch, I balanced the colors in the image. This tool is very powerful in PixInsight. You can manipulate the histogram with great detail and with very detailed feedback as to what your changes are. It even tells you how many pixels you have clipped, so you can manage that finely as well.
  7. With the new HDRWaveletTransform process in PixInsight, I brought out the details of the galaxy, and then adjusted contrast with a curves adjustment. To do an effective transform, you need to mask the stars so they don’t get bloated. I created two masks: a star mask and a galaxy mast. I subtracted the galaxy mask from the star mask (the original included some details from the galaxy) and ended up with a decent mask.
  8. From here it was into Photoshop, where I applied a minor high-pass filter (8 pixels, blending mode Soft Light, opacity 41%), and adjusted saturation (+13) and color balance.
  9. Back to PixInsight for noise reduction. The newer GREYCstoration did not do a good job on the noise in the image. The ACDNR process, however, allowed me to focus the noise reduction on the color part of the image and did a very nice job without losing any details in the image.

Here is the final image:

M63 -- The Sunflower Galaxy

Plato Craterlets

On the plane returing from the SAP Sapphire conference in Atlanta, I was reading Sky & Telescope. In the section on Exploring the Moon. This is a regular feature and I’d link to it, but they don’t carry the story on-line, or at least not yet. It seems that is the magazine only available to April and I was reading the May edition.

It was an interesting article about the discovery of small craters on the floor of the crater Plato. Plato is a large, flat-bottomed crater near the top of the Moon, in about the center. This discovery, the article said, started a great series of discoveries of other craterlets and even transient phenomenon. At the time, people believed that the craters on the Moon were volcanic; today we know they are impact craters as the Moon has been dormant for several billion years. Altogether fun to read about the craterlets and something to look forward to seeing.

I had that opportunity last night. Having arrived in late afternoon, I was home for dinner. After dinner, I was outside with my daughter playing and I noticed the Moon. Here was my opportunity. I opened the observatory and started up the scope. There were some high clouds, so I didn’t expect great seeing and therefore I did not worry too much about scope cool down.

The Moon was one day after the first quarter, with the terminator just past the mid-line. Observing with a 22mm eyepiece (127x magnification), Plato was nicely visible, just on the light side of the terminator. Plato looked flat at first, but at select moments of still air, a craterlet would appear. It was quite exciting to see something I had read about just hours earlier. I really only saw one craterlet. At higher magnification, using a 3x barlow, the poor seeing was much worse, and the craterlet winked in and out of visibility. I can understand why people saw these objects as transient phenomenon.

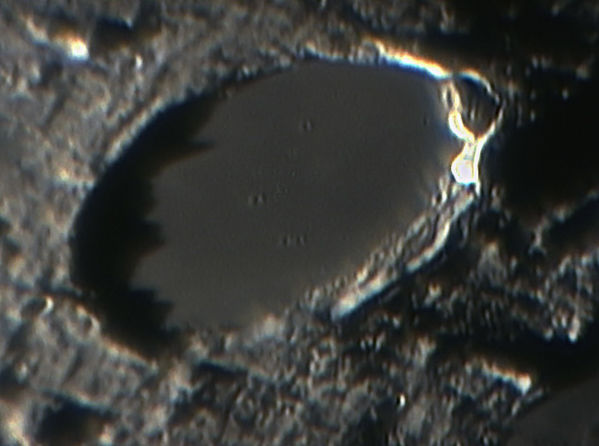
I had not planned to image that night, but the web cam was handy and easily set-up. I took one AVI of about 90 seconds. After processing in Registax, PixInsight, and Photoshop, I got the following result.

Plato Crater

There are six craterlets that I could find, four easily. These larger craterlets are from 1.7 to 2.4 kilometers in diameter.

The right side of the image is sharper because I had real trouble with Registax’s tracking and aligning except when I used a single, very large alignment box. That selected frames that were clear on the right, without regard to the clarity on the left. Hence, the right is clearer. In addition, I used sigma reject in Registax to reduce the effect of a bad pixel on my web camera.

Astrophotos vs. Reality

On the question of "does the photo look like the real thing" I don’t think there is an easy answer. With long-exposure astrophotos such as the Eskimo Nebula from Kitt Peak, this beautiful shot of NGC 1365 on APOD (credit SSRO), or even my shot on NGC 891, there is always an element of judgement in how the astrophotographer made it look. While you can set standards on star color so your color balance reflects the true spectral colors, judgement in processing I think plays a key role.

We can leave aside narrowband or non-visible electromagnetic raditaion images. Reality vs. perception for those is like guessing what things look like to a bee or a cat.

At the Advanced Imaging Conference in San Jose last November, I listened to a discussion between David Malin (of the Anglo-Australian Observatory) and Jerry Bonnell (of NASA/USRA and co-editor of APOD). The conversation had started from the question "Does the photo look like the real thing?" in reference to astrophotos.

Malin said that, if processed correctly, the image would be the same as if we were able to turn up the magnification and sensitivity of our eyes. If we were out in space in front of the Crab Nebula (M1), we would see what the image shows us.

Bonnell, on the other hand, said that we don’t really know what things would look like if we were there. The density of the light is such that were we close to an nebula, it could be so faint as to be invisible. That even "turning up our eyes" would not necessarily yield the same colors regardless of tuning based on spectra.

My apologies to Malin and Bonnell if I have mistated their positions — this is as I recollect it.

I tend to favor Bonnell’s opinion, although I am certainly not one to pick an argument with Malin! I know that when I put together an astronomical image, I do just that — put it together. Separate images for R/G/B and Luminance, darks and flats applied, sigma reject used to reduce noise and multiple images summed, finally combining into a full-color image. Then comes sharpening with high-pass filters, digitial development, and wavelets, all that affect the relative contrast of objects in the image.

While no data is added, with all these steps I cannot assert a connection to "what it really looks like." I try to make it look pleasing to the eye, but I don’t know if it is accurate. And unless we actually go out there, with probe or spaceship, I don’t think we will know what it looks like.

Certainly good science can be done and we can know many facts about astronomical objects. Visual perception, on the other hand, is so subjective I don’t think we can say what it looks like.

f10 Imaging

Several weeks ago, I finally set up my C-11 OTA, TCF focuser, Pyxis field rotator, AO-7 and ST-10 for imaging at f10. That’s 2880mm with only .5 arc seconds per pixel unbinned on the ST-10. Let’s just say that results were mixed. I’ll admit that seeing wasn’t great, but I don’t think I’ll try this again.

There are some good things about imaging at f10.

  • The AO-7 guides very well. Round stars, no wandering, very nice even at this long focal length.
  • Objects are large with good magnifications (if only they were clear — see below)
  • I could use the Pyxis field rotator with my C-11

But the negatives outweighed the positives.

  • Finding objects was hard. Where a sub-second focus exposre 3x binned would find an object at f6, 1 or more seconds was required for each finding and framing exposure.
  • It was murder trying to get to focus. FocusMax struggled because seeing changed overwhelmed focus changes.
  • It was impossible to find a guide star. With the AstroDon Clear filter, it was a struggle to find a star bright enough to guide at 1-2hz with the AO-7, minimum (in my mind) for decent results at f10.
  • So that was guide stars with the clear filter. Forget color. No object I tried had a guide star in blue that was usable. (Sidebar — NGC 891 – great guide star, available only at f6.)
  • No data. I felt as if I was imaging with an Ha filter. After 5 minutes, the object was hardly brighter than the backgound (100 ADU out of 3500)
  • Fuzzy results. The seeing errors overwhelmed the ability to resolve. All I got were high magnification, blurry results. It reminded me of when I try to use a high magnification eyepiece or a barlow, and, while the result is more magnified, it is not a better image to see or record.
  • It sure makes me wish I had a 20″ Richey Chretien. 🙂

It only took a couple of years, but now I have learned that all of the advice about long focal length imaging is correct. It is really hard and, without great equipment (no, good won’t suffice), it will not produce adequate results.

Here is the result:

NGC 7331 @ f10

So f5.95 with an C-11 is OK, but f10 is not.

A Good Night Viewing in Aguanga

On the day after Thanksgiving, my wife’s sister and brother-in-law came over to Aguanga for dinner. We had a nice afternoon and grilled hambugers (I am sitll getting used to the new three-burner grill).

After dinner, my brother-in-law and I took out my old 8″ Celestron SCT on a CG-5 mount to look at the stars. It was not a very transparent night. Contrary to local averages, the dew point was above 50 degrees F, and the when we went out, the temperature was 53 and falling quickly. We had taken the scope out before dinner, so when we went out, it was already covered with dew. Using a hair drier, we dried off the Telrad, and heated up both the corrector (with the cap on) and the objective. That was just the beginning of the dew but in the end the dew did not prevent a successful night of observing.

Our first target was M31, the Andromeda Galaxy. It is dark enough in Anguanga so that with either binoculars or a telescope, you can see the elongated shape and spiral nature of the galaxy. It is visible naked eye as well.

For visual observing, Celestron’s Sky Maps is actually very useful. It charts the constellations by season, and lists findable double stars and deep sky objects for each constellation. That book guided our observing for the evening, along with my rusty object finding skills.

Our second target was M15, the globular cluster in Pegasus. It was both easy to find and wonderful to see. That was followed by M2, another beautiful globular. Though they were low in the sky, we observed Albireo and M57, the Ring Nebula.

After the look at the southern sky, we moved north and west to the faboulous Double Cluster in Perseus. It is larger than the field of view of the C-8 with a 35mm plossl, but still beautiful. Then came, for me, the highlight of the night. I found M33, the Triangulum galaxy, on the chart. I didn’t think I could find it. I did find it. We could see the circular flow of the galaxy — it filled the FOV at 35mm.

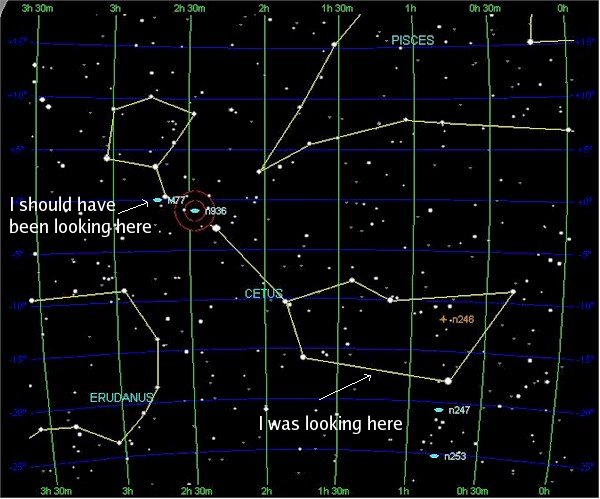
Emboldended by finding M33, I saw M77 on the chart and decided to try and find it. This is where I failed at reading a chart and looking at the sky. I thought I found Cetus, and the circle where M77 lies. I searched for probably 15 minutes (at this point, the temperature had fallen into the 40s). I never found it. My problem was that I mistook the western portion of the constellation for the eastern portion. The picture below shows my mistake. I didn’t figure this out until after all the guests had left and I looked at a wider view star chart. That wider angle helped me see my mistake in location.

Click for full size

At that point, we were getting cold. So we looked at M42, the Nebula in Orion. It was clearly visible even though it was only 15 to 20 degrees above the horizon. Yielding to ego, I tried to find M1, the Crab Nebula. I am fairly confident I was looking in the right place, but I could not find it.

The major side bar to the night was the dew. We had to dry off the objective every 5-10 minutes. That is what goes with working below the dew point, I guess. I imagine that the objective needs cleaning. And I found both the 99% isopropyl alchohol and the distilled water to make lens cleaner. Altogether a great night of observing. Let us all never forget that even with our wonderful detectors.

Astronomy Podcasts

The great astronomy podcast Slacker Astronomy has moved on to Slackerpedia Galactica and AstronomyCast. I can’t say much yet about Slackerpedia, but AstronomyCast is excellent.

On a long drive last Friday, I listened to several episodes of AstronomyCast, and it is excellent. Dr. Pamela Gay, one of the main protagonists at Slacker Astronomy, provides excellent explanations of astronomical topics with good counterpoint and hosting of Fraser Cain of Universe Today. Well worth a listen on iTunes or direct.

On a related note, the old/new Slacker Astronomy site linked to a great video of the cleaning of the 200″ mirror at Mt. Palomar. Take a peek, it is a great three minutes.

SMART-1 Impact

I could be totally wrong here but I believe I saw the flash of impact from SMART-1 on the Moon the other night.

I was observing from the Anza Valley in Southern California at about 3,400′ altitude. The flash was well into the dark area of the Moon where it was advertised to be. It was faint and short. It came a little later than expected — it impacted at 05:42:21 UT, initial estimates were 05:41.

I was observing with an 8″ SCT and a 35mm plossl.

I don’t think I was imagining things, but I haven’t seen any independent statistics that would confirm that I could have seen it.

I would have posted this sooner but I was travelling for work.

Globular Clusters Galore

This last weekend I had my first chance to do some serious observing from Aguanga. I brought my Celestron 8″ SCT up as a permanent addition to the high desert site. I set the telescope up before it was fully dark. My first target, used to get the finder aligned, was Jupiter. A nice view of the planet and the four Galilean moons. Then I waited for dark.

After it was mostly dark (not fully “astronomical twilight“) I found M57, the Ring Nebula in Lyra. It was a nice pretty ring. I could not see the star at the center.

Using my Celestron sky guide, I looked for good objects in the southern sky. The new house has a great view to the south, something completely lacking in LA. The first and most obvious target was M8, the Lagoon Nebula. Almost as impressive as the nebula in Orion, it was a beautiful wispy sight.

I then turned to the constellation just to the north of Sagittarius, Ophiucus. It has several globular clusters. It straddles the Milky Way, and the globular clusters orbit the Milky Way, so this is a good place to see them. I have always liked observing globulars. Their compact and dense fuzziness, I find them most beautiful. I started in the southern section, looking for what I thought was M9 or M10. Instead, I found M19 and M62. With some help from the star chart, I moved north to find M10 and M12. These were particularly beautiful. Higher above the horizon, I could see foreground stars — really very nice. I’d love to image these object.

Finally, I sought out and found M14. The search showed me several things. The dark of Aguanga is sufficient to see the stars on the chart. I can search the sky with the 8″ SCT. And next time I’ll bring the Telrad. M14 was not as impressive as the others, but it was a good find.

Finally, a complaint. A neighbor to the north has a mercury vapor lamp that is so bright I can see a shadow. with dark-adapted eyes, I feel I could read by the light. Like a full Moon that does not light up the sky, it is a great distraction. A minor annoyance at a great location.

Pictures Posted

I have added several photos to the archive today, including a series of M51, the Whirlpool Galaxy. This object was one of the first things that I imaged. I posted my first processing and an updated one I did today. I also posted a decent version of some data that I took in April of 2005. This provides a good comparison both changes in processing and better data acquisition.

The older version of M51 clearly suffers from too little exposure time.
The image is noisy. I was suffering at the time from bad circular
gradients from poor positioning of my focal reducer. The 2005 data
is pretty good in luminance (65 minutes) but short in RGB (30 minutes each).
The RGB also suffers from being taken binned 2×2, a practice I do
not recommend in light polluted locations such as I have here.