It has been three months since clear skies, the new Moon, and being in Lake Riverside have converged on the same day and allowed for imaging. These factors came together on May 15th. I collimated the C-11 back at the full Moon and was ready to go. (Dew foiled my attempt to get even any Ha data that full Moon night but that is another story.)
I used my general approach for finding targets. I use The Sky’s database manager data wizard to query objects above 40 degrees or so. Moving from object to object I record my interest, the transit time, and the availability of a guide star. Up until this weekend I have tried to capture all of my data on one side of the meridian, preferably the east. This simplifies the taking of flats (with the ST-10 the camera rotates 180 degrees to maintain framing after a meridian flip) and the east has a better view from the western pier in the observatory.
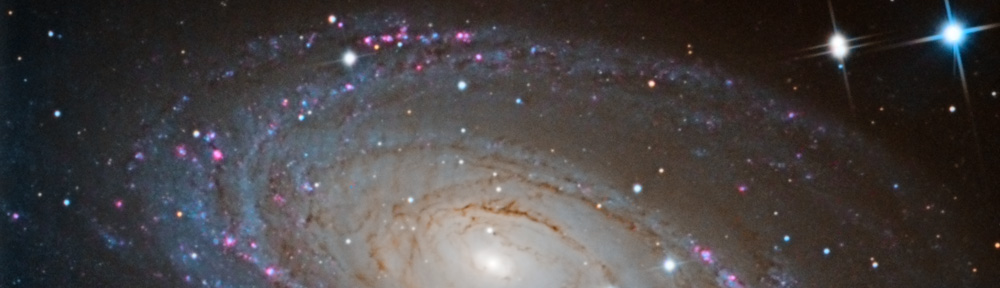
I chose to image NGC 5033, a spiral galaxy in the constellation Canes Venatici. Is looks very interesting and has a very bright star that can be used for a guide star. Astronomical twilight would occur at about 9:15 PM PDT and the galaxy would transit at 10:32 PM. I hoped to get data both before and after transit, that being the best time to image as the object is highest in the sky.
I had my usual troubles with autoguiding and initial start-up but got imaging going by 9:40 or so. In the first of many little glitches, I had set CCDCommander to send me a text message when the first set of luminance images were done, but the message didn’t get sent because Zone Alarm had interrupted the request to send e-mail. Security software can be annoying. I was in the house watching Midway with the family, so I didn’t go back to get the next series started and lost 20 minutes of imaging time before the meridian crossing.
I planned on getting 50 minutes of luminance data and 20 minutes each of red, green, and blue. After having trouble on my last imaging outing with dark pixels on the color images, I wanted to make sure I had at least six sub-exposures and adequately dithered the frames—six frames to enable a sigma reject algorithm and dithering to move the dark pixels. So my luminance exposures were 300 seconds and my color were 200 seconds. I had other little issues with losing sync on the meridian flip and FocusMax acquire star not returning exactly to the original framing but overall things went fine the rest of the night. These problems would be solved if I were able to spend several days in a row in the observatory—a good goal for the future. I was able to use the new window shade to take flats after putting the white lights on the dimmer for the rope lights.
I ended up with 110 minutes of LRGB data, 50 minutes of luminance and 20 each of red, green, and blue. The RGB images were binned 2×2. I performed my data reduction, alignment, and combination in CCDStack. To simplify alignment, I process the luminance first, then save a binned copy of the final image. I then use that binned image as the master to align each of the sets of color images. This means that frames are only re-sampled once for alignment and that all combined frames are fully aligned.
Once I was processing the data it was clear that I really had inadequate imaging time for this object. At magnitude 10, it is quite dim. When the image was processed to bring detail to visibility, it was quite noisy and grainy. So I did the best that I could with it.
I did most of the processing in PixInsight. I have a standard approach when starting on an image that makes the later combine steps easier. The basic idea is to get a standard crop of the images that will work across all frames, eliminating any artifacts around the edges from the combine / integration process. The RGB frames are scaled up two times to match the luminance. Then, using the dynamic crop tool, I select a crop that will include solid data from all frames. I save an instance of the crop settings on the desktop and then save the process icons. This allows me to start and re-start work on each frame from a consistent point.
On the luminance, I used both the histogram tool and curves to bring out the details. A very nice feature of the histogram tool in PixInsight is the ability to see the number of pixels you have clipped so there is no guesswork. Generally I take several quick passes through the data before settling on a final processing approach. On this image, I took a copy of the luminance and applied a four-level HDR wavelet transform, recombining it with the original using PixelMath. This brought out the dust lanes in the center of the galaxy. I did need to create a star mask to preventing ringing when doing the HDR wavelet transform.
I tried to keep things simple on the color data. I used a channel combine to create an single RGB image, then used histogram to eyeball the black points across the colors. There is are some new tools in PixInsight that really helped the color. The first is Background Neutralization. In my experimentation with this tool, it will allow you to drop out the noisy background in a color image. I used the tool in truncate mode to eliminate most of the background data in the RGB frames. This is consistent with what RickJ suggested in the BAUT Astrophotography Forum. There is also a color calibration tool that appears to correct your color balance. I’ll have to work on understanding that.
My processing approach on images is to create solid luminance and RGB images. I then use channel extraction to pull the individual red, green, and blue components out of the RGB image. The final combine step is to use LRGB
Combination to create the final LRGB image. I touched up color and contrast and then moved to Photoshop.
In Photoshop, I used clone stamp and healing brush to fix a couple egregious color issues. I also used Noel Carboni’s Astronomy Tools actions to reduce noise in the image and tweak the star size. The final step was to add a layer processed with a high pass filter, masked to reveal only a few key locations, and merged with “soft light” blending mode to highlight some details.
Here is the final image. Still a bit noisy and needing more data, but I think it looks OK. Click on the image to go to the gallery and a full sized image. Comments and suggestions are always welcome.
